SIGNET How to guide: Travel Advisor Profile Update
Please ask your Branches/Advisors to complete their sign=up with Signature – SIGNET.
Click here for how to add to your Signature profile from where we pull much of the dynamic information for your site.
Make a note of their branch/advisor ID keeping in mind:
Is a Signature ID required for both branch & advisor or is branch enough if there is only 1 advisor?
Answer:
Ideally enter both, but the front end system will pull the first advisor from the agency if only the agency ID is available
After site has been set-up, agent/advisor will receive and email with:
- Where to login
- Admin Login details
- A link requesting you to update the password
Select site that you are working on -> Dashboard
On left hand menu select Appearance -> Customize:

A. Upload Logo:-> Click on Site Identity
a. Ensure Site Title is correct.
b. Optional – Add a Tagline
c. Upload Logo (Max size 350 pixels wide by 90 pixels high)
Preferably a .png file with a transparent background
Edit image in WordPress tutorial or use Adobe Photoshop or any image editing app:
Click here
d & e. Type in the dimensions of the logo in the boxes provided in site identity
f. Display Site Title and Tagline
g. Display Site Icon (optional) – This displays as follows:

g. Display Site Icon (optional) – This displays as follows:

h. Final step, click on Publish on top left of the page. Wait for it to say Published and then close out this step by clicking on the X and view your page. Need to adjust? Repeat the steps until satisfied with the look of the website.
B. Select Template, Color and Font:
Click on Preset Styles

a. View the 4 dropdown items and make your selections. On the right-hand side, as you make a choice, you can preview how a selection changes the page aesthetics
b. Inspirations – select a preset template then adjust using b, c & d to suit

Final step, click on Publish on top left of the page. Wait for it to say Published and then close out this step by clicking on the X and view your page. Need to adjust? Repeat the steps until satisfied with the look of the website.
5. Customizing Additional Basic choices
A. Login to your website
B. Edit page (click on top bar edit page button)
C. Click on Appearance
D. Click on White Label Options
E. Complete the Yellow Highlighted options. You may change the yellow highlighted selections, set to a default answer.


Click on Save Options on the bottom left part of the Form and view your website for accuracy.
A. Login to your website
B. Edit page (click on top bar edit page button)
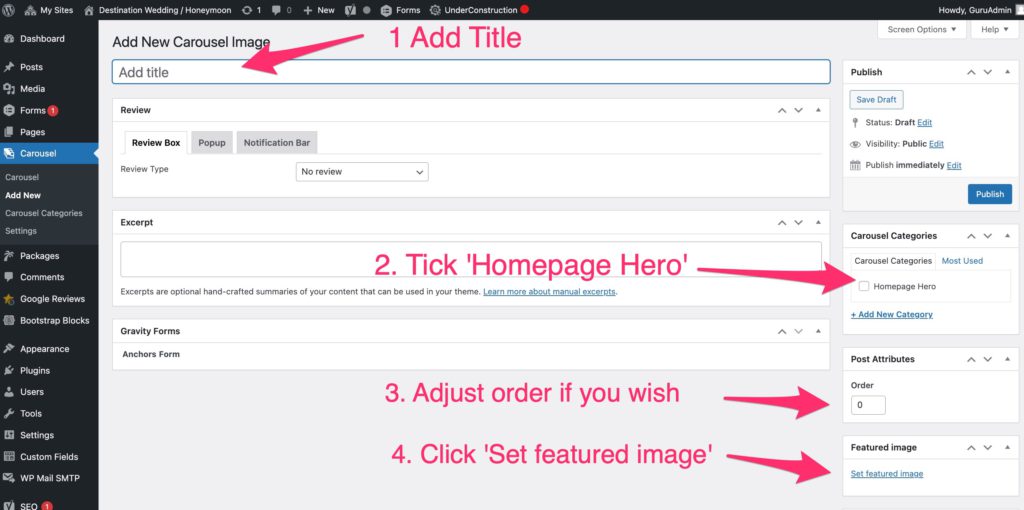
C. Click on Carousel on the left side menu – select ‘Add New;

D. We have provided you with a number correctly sized (2000 pixels X 600 pixels), licensed photos for a variety of destinations, vacation types and diversity.
Index of Activities & Destinations of images uploaded to the ‘Global Media’ library for your use:

F. Continue as below and repeat:
Review the pages of pictures and decide the pictures you would like. You can use as many photos as you would like, however for optimal performance we recommend no more than 5 photos be on the Carousel at one time. (otherwise you page load starts slowing down and this is not good for SEO)
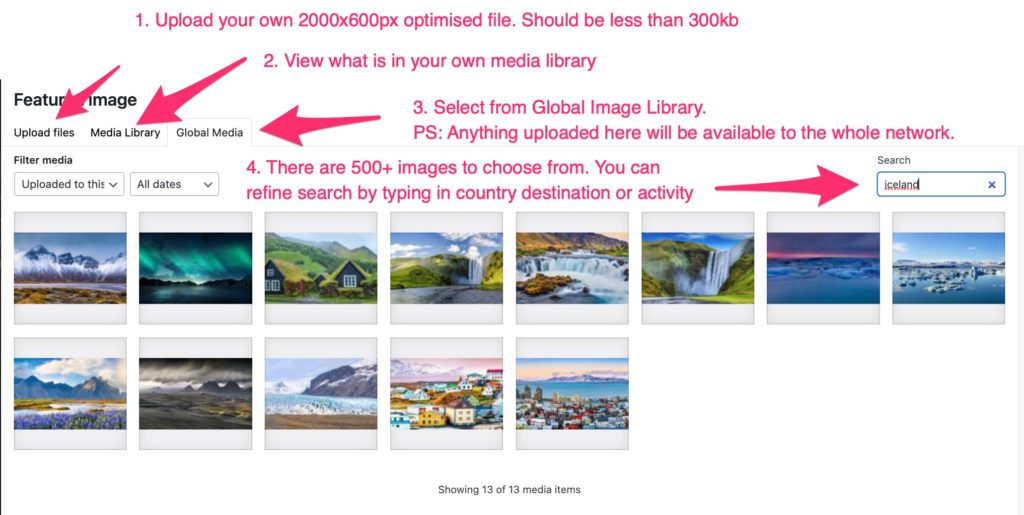
Uploading your own images:
You can upload your own images using ‘Upload Images’ to your own ‘Media Library’. Please see screenshot above.
Please remember to resize the images to 2000px wide x 600px high. (besides Photoshop you may wish to use some of the tools below).
In addition to your own images, you may wish to use some of the image libraries below:
FYI: https://www.sitepronews.com/2020/02/07/top-10-free-stock-photo-websites/
Also:
https://unsplash.com/ – FREE
https://www.pexels.com/ – FREE
https://www.shutterstock.com/
https://stockfresh.com/
https://www.canstockphoto.com/
https://www.istockphoto.com
Free Image Resizer:
https://resizeimage.net/
(Video: https://screencast-o-matic.com/watch/cFeiqtD203 )
Free:
Compress and compare images with different codecs, right in your browser.
https://squoosh.app/
(Video: https://www.youtube.com/watch?v=8QYVWrBDz2Y)
G. Once submitted as above, you can also select a photo and hover your cursor over the photo name. A menu will appear.
H. Click on Quick Edit. Here you can customize the name of the photo, be sure the Homepage Hero button is checked and also select the position you want this picture to be on the Carousel (spot 1, 2, 3 4, or 5)
I. Click update then view your site for accuracy.


Please refer to Packages Tutorial – Click here